Shoji Screen sliding door is a sliding door which originates from Japan. Interior shoji doors can be easily removed for expansion of a room or space to be used to host an event like a party. Traditional shoji screen doors are made with hands by craftsmen also known as tategu-ya.
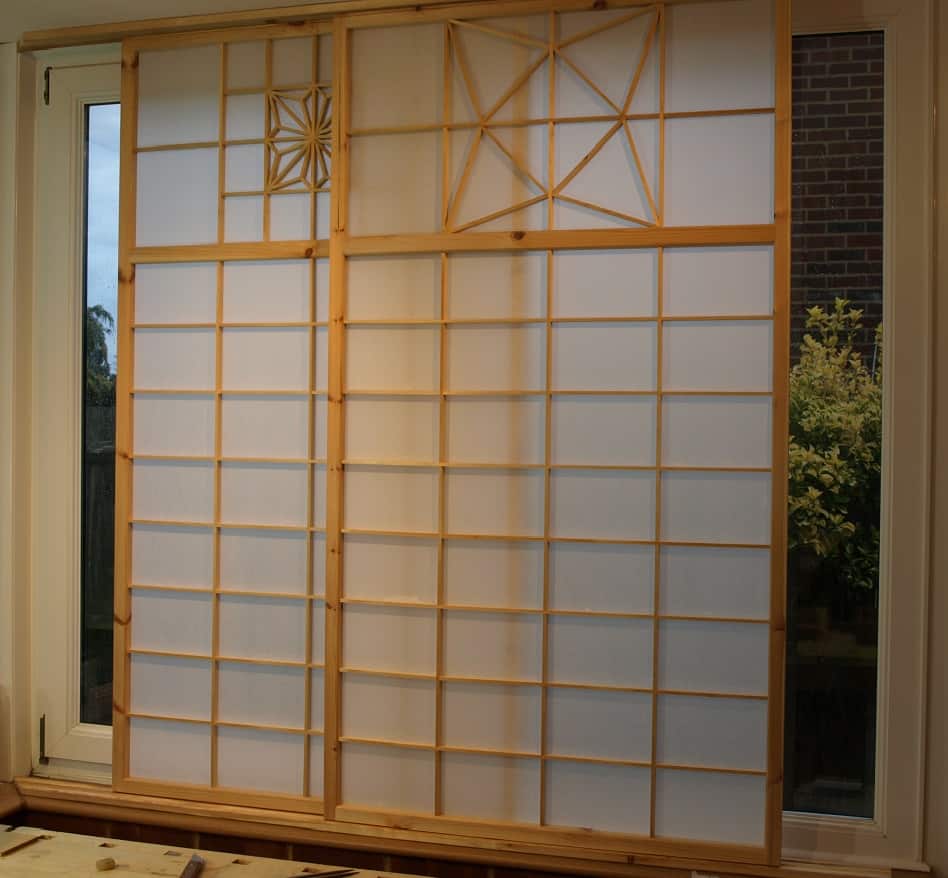
Shoji door panels are wooden frames structured around translucent paper glued onto a strong lattice structure. The pieces of the lattice, called Kumiko by the Japanese, are woven together in form of a basket, then the frame is structured and upheld by tenon and mortise joints without the use of screws or nails.
The paper, also called washi, is traditionally made using the mulberry tree’s fibers and is referred to sometimes as rice-paper. If the local craftsmen could make Shoji doors, if you follow instructions on how to make it, you can also make one yourself.
Keep on reading this article to find step by step processes on how to make a Shoji Screen sliding door.
Step One: Measure your opening
Measure your opening for your shoji screen sliding door, and also how thick the door frame is. Leave sufficient space for the hardware for door hanging. Allow enough space for the door hanging hardware, like within the track of a typical pocket door. If your door track shows on the outer part of the wall design your Shoji door to cover up the track on the wall to the extent to which you like.
Step Two: Cut out your stiles for the frame
Cut 2 vertical wooden pieces using that height measurement you got in Step one. These are for the right and left sides of your shoji frame, they are known as stiles. The size of the Shoji door you’re making determines how thick the wood will be. However, typical rails and stiles are 2 ” × 1 3/8″. Use any kind of wood you want to, just make sure they aren’t those that are warped or those that have blemishes like large knots. The wood used for traditional shoji is close-grained and soft like cedar, but you can use almost any type of wood.
Step 3: Measure and cut out the rails
Calculate the width of both stiles for the right and left side of your frame, then subtract it from that width measurement you had in step one. Use this measurement to cut out two pieces of wooden material. These will be your horizontal rails.
Step 4: Join the stiles to the rails
Lay down the stiles beside each other on a clean flat surface. Place a rail by the top, right between the two stiles, make sure the topmost end of your stiles aligns perfectly with the upper edge part of your rail, thereby forming a smooth joined surface. Place the second rails too by the bottom, right between the two stiles making sure the bottom end aligns perfectly with the lower edge of the rail, also forming a smooth joined surface. Nail the rail and stiles to each other. Drive your nail from the outer edge of your stiles, through your stiles into your rail ends.
Step Five: Fill up your nail holes
Fill up your nail holes using wood putty that is sandable and allow it to dry. Smoothly sand your entire wood frame.
Step Six: Create a grid design with Kumiko
Measure the dimensions for the inside of your frame. Cut many wooden strips of 3/8-inch-by-3/8-inch to the width and height measurements then add ¼ inch. All these strips are your Kumiko or slats, of the Japanese shoji screen.
Their work is to hold together the paper in the frame. You are to use them to create a simple grid design, use as few or as many as you like. This can be asymmetrical or symmetrical. Layout your Kumiko on a clean flat surface using in your desired pattern.
When you’ve gotten your desired pattern, take the Kumiko that’ll be in your door’s middle part then weave them well together, use any basket-weave technique you know. You will have to bend your Kumiko slightly, you may also have to make use of a good rubber mallet just to set them straight into their position.
Step Seven: Fit the Kumiko into the frame
Lay your grid upon the frame. Then use a marker to mark the part of the inside edge of your frame where your Kumiko slats touches it. Use chisels to create rectangular holes that are ¼ ” deep and 3/8″ square in your frame’s inner side at the point where you’ve marked earlier. Fit in the Kumiko directly into these holes you’ve created.
Step Eight: Add your Shoji Paper
Cut out the size of the needed shoji paper that will fit your frame perfectly and then roll it all up. Apply rice glue onto a side of your Kumiko structure, then place at the top and on top of your Kumiko the end part of your cut out paper roll, and then roll it downward inside your frame. Hand press the paper upon your glued Kumiko. Give the glue time to dry.
Step Nine: Final Installation
Join your hanging hardware onto the top part of the Shoji door, then insert your door into your doorway space or area, placing your door hardware in your slide rail.
Conclusion
The Japanese Shoji Screen sliding doors are not traditional to Japan alone anymore, now they are beautiful interior pieces that adorn the homes of people all around the world. They can be sometimes very expensive or difficult to get. Also, you might not find any in the market that suits your taste.
That’s why we have put together in this article practical, detailed, and easy steps on how you can construct your own Shoji Screen sliding door. However, If you have no foreknowledge or experience in carpentry or woodwork you will need the assistance of a handyman in making your own Shoji sliding door.